- Questions? Contact the Team
- 877-989-8180
**NEW FEATURES! **
We’ll be updating this post with new features as they become available.
Delete Bad Numbers – Dec 2018
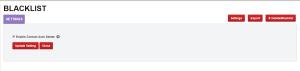
Our newest feature is an option to delete bad numbers from your contact list, automatically. This is a very valuable tool if you do a lot of imports but is recommended on any account. If a number is returned with an unknown carrier – meaning text messages cannot be delivered to it – they will automatically be removed from your list. Since you are charged for a text for every number you send to, regardless of whether or not the message can be delivered, you’ll want to keep you list as clean as possible. You can see a report of these number on the Blacklist page, use the search option type for Bad Numbers only. You can export this list for your records.
To enable the Bad Numbers feature go to the Mass Delete/Blacklist page under My Contacts on the left-hand menu. On this page click the red Settings tab and check the box for Enable Contact Auto Delete and click Update Setting. Numbers are cleaned out daily.
TXT180 Reporting – Nov 2018
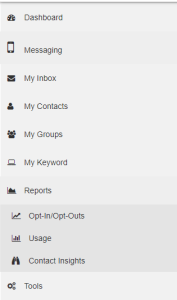
This month we are excited to announce the new TXt180 reporting system! On your left-hand navigation menu you will see a tab labeled Reports. When you click this tab it will expand to show three report pages: Opt-In/Opt-Outs, Usage, and Contact Insights. We’ll go over each one below.
Opt-in/Opt-Outs Report
On the Opt-in/Opt-Outs Report page you can will see details reporting on the number of opt-ins and opt-outs. You can see these stats by keyword, or for all keywords on the account. You can also set a date range to view: Today, Yesterday, Last 7 Days, Last 30 Days, or you can set a Custom date range.
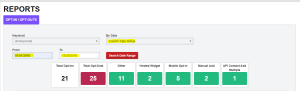
As you can see from the graphic, the opt-ins are also sorted by the origination of the contact. You will be able to easily track how many numbers are opting in by texting your keyword: Mobile Opt-in, or through your widgets, api, etc. This also shows you the date of each opt-out so you can track the times when most people have opted out and can compare that with the type/time of messages you are sending out to your contact list.
At the bottom of this TXT180 reports page you’ll see the most popular keywords and groups on your account. The top ten keywords and groups (if applicable) are listed and show how many opt-ins and opt-outs you have on each during the selected time periods.
TXT180 Usage Report
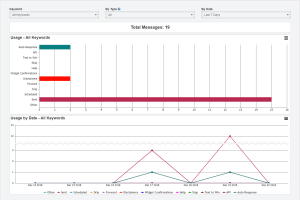
The usage report page gives a break down of all message use on your account. The top graph shows message use by keyword and type of message (see the legend at the bottom of the page for an explanation of each type). Again, you can see these stats for an individual keyword or for all keywords and you can sort the usage by message type and choose the date range. The second graph shows message usage by type and by date. Hover over any line or bar to see a numerical representation for that type/date.
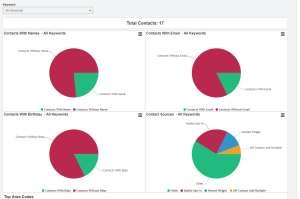
TXT180 Contact Insight Report
The TXT180 contact insight page provides pie charts that show how many of your contacts have a name, email, and/or birth date listed on the account. There is also a pie chart showing the contact source – this is a quick way to see which method most of your contacts are using to opt-in. At the bottom of the page you’ll also find a break down of your contact list by area code and timezone. You can view these graphs by individual keyword or for all keywords on your account. *Tip – to collect name, email, and birthday from your contacts send out a link to the hosted widget (found under Tools on the Website Widget page) and ask your contacts to update their contact data.
Forward Group Opt-in Numbers to Cell or Email – Oct 2018
Similar to the Inbox forwarding options, we’ve added the ability to create forwards at the group level. When a new contacts opts-in to a group you can set up a notification to be forwarded by email or by cell phone to 1 or more email addresses or cell numbers. The forward will have the number of the person that opted in and the group and keyword they opted in on.
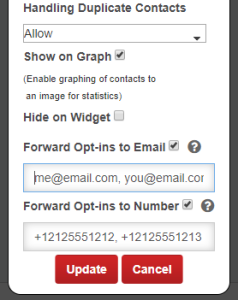
To add this option on a current group click the Edit icon next to the group. At the bottom of the page you can check the box for Forward Opt-ins to Email and/or Forward Opt-ins to Number. You can do both or just one or the other. You can also forward to multiple email or phone numbers, just separate them using a comma. Keep in mind, it will deduct 1 message from your account balance for EVERY message forwarded to a cell number. If you have this setup at the keyword level, using the Inbox Settings, and use the same number at the Group level you could get two text messages of the same notification. See the screenshot of the settings below.
When creating a new group you will see the same forwarding options on the setup page.
Why forward opt-in information?
This is a useful option for a number of industries and uses.
Real Estate: if you use groups for multiple listings you can have the agent assigned to that listing as the forward number on that group. When a potential buyers texts rental-1 to the short code the agent in charge of that listing can get an immediate text telling him/her what number texted in for information on that listing.
Salon: Set up a group for hair, nails, massage, tanning, etc. Each group can have the opt-in info forwarded to the people/person that manages that area of the salon.
Church: setup forwarding options for the leaders of each group – youth, choir, volunteers, etc.
Mass Delete and Blacklist Tool Sept 2018
We’ve just added a new tool to the TXT180 platform today, 9/19/18! The mass delete and blacklist tool will allow you to paste in up to 1000 numbers at a time to either delete or blacklist them from one or multiple keywords on your account. There are three options that we’ll go over.
The first option simply deletes the number from your account – this is useful if you have a list of people signed up for a current session or class and you want to remove them all at once. This does not mark them as an optout (marking as an optout would prevent you from being able to add them in again at a later date – if they signed up for another class in the future, etc.). After they are deleted they can still opt back in by texting the keyword to the short code.
The second option is to delete the contact and mark as an optout. If a number is marked as an optout you can’t add them back in from your dashboard but they can still opt back in from their phone by texting the keyword to the short code or by entering their information in a website widget and replying YES from their device. This is useful if you have a list of contacts that need to be removed and you want to make sure no one on your staff can add them back in by mistake. Once you’ve marked a contact as an optout you cannot undo this action – meaning you can’t remove a number from the optout list. The only way to remove them from the optouts is for them to opt in again from their device.
The third option is to delete the contact, mark as optout and blacklist. This option will remove them from the contact list, mark them as an opt-out, and blacklist them from that keyword. If a number is blacklisted you can’t add them to the account and they can’t opt in by texting the keyword or using a widget. This is useful if you have someone that is abusing the system and you don’t want them to be able to be added to your list. Or if you had a paid subscription list and don’t want people to be able to opt in if they haven’t paid their subscription. You can unblacklist a number at any time if you want them to be able to opt back in on their own again at a future date.
Other uses include:
Download a copy of your opt out list. All opt-outs are stored here by default so you can now download a copy of these at anytime using the red Export button on the top-right side of the page.
Moving from another provider: if you have a list of opt-out numbers if is a good idea to add them in as optouts on the new keyword and short code.
Have an optout option in an internal or separate system: make sure your text database is update with this info as well.
School graduation: have a list of seniors that have graduated and are leaving your institution, quickly delete them all from your list at one time.
*NOTE: Numbers can be added to the optout or blacklist even if they are not a current contact on your account.
Age Verification Option Added Aug 2018
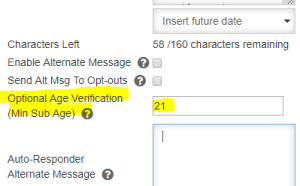
There are a number of instances where age verification may be needed. If you sell alcohol or tobacco you must ensure you are not marketing to anyone under-age, according to your local laws. When advertising your keyword you should make sure you are only advertising in places where age has been verified, such as inside the bar where age is checked at the door before they can enter. We’ve now added a feature to help protect you in this circumstance, as well. Any keyword can be set as an age-verified keyword by going to the My Keywords page and using the Edit icon to the far right. In the middle of that page you’ll see a box for Optional Age Verification. Leaving the number at 0 means their is no required age verification for that keyword. Put in any number for the minimum age to activate the minimum age requirement, see the example below. Here we have the minimum age set to 21.
When a person opts into this keyword they will now get a message saying, “Please reply with your birth date mm/dd/yyyy to complete your opt-in”. If they don’t reply with a valid date, that meets the minimum age requirement, they will not be added to the account.
Age verification could also be used if you have an app that requires the user to be of a certain age to download it. Other uses might be social media accounts that have a minimum age requirement, sweepstakes that require the entrant to be of a certain age, any type of club that is age restricted, etc. If you set a keyword as age-verified the hosted and website widgets will automatically update to require the contact to enter his/her birth date to join the campaign.
NEW Scheduler for Text to Win Campaigns – July 2018
We are SO excited to let you know that you can now SCHEDULE your text to win campaigns! You no longer have to login and use the feature at the exact time you want the winners to be picked. To schedule the campaign for the same day, simply fill in the settings and pick the time you want the winners to be chosen (Go to Tools on the left hand menu of the dashboard and click the Text to Win tab on that menu). At that time you specify the number(s) will be chosen and the winning text will be sent.
If you want to schedule the text to win for a future date you can do that from the Scheduler. Click on New on the calendar date you want to pick the winners, set the frequency (one time, weekly, etc) and set the number of winners you want selected. Be sure to check the box for Text to Win. On the second step you’ll pick the group, or All Contacts, you want the winners chosen from, you’ll define the message, and set the time you want the winners to be picked. Don’t worry, the winners aren’t chosen until the time you have it set so it will always choose from the current list of contacts that are opted in at that exact time! You can update or cancel a scheduled Text to Win campaign, anytime prior to the time you have set, by clicking the event name on the scheduler for that day.
If you need to delete a Text to Win message you scheduled for the same day, you’ll see that under Messaging on the Pending/Sent Messages page. You can delete or edit that message anytime prior to the time you have it set to go out. Use the icons to the far right: trashcan for delete and square with a pencil to edit.
Updated Drip Features – June 2018
New updates to the Drip Campaign feature include a column and check box functionality to show whether each message is “Enabled”, active in the account to be sent out, on the main Drip Messages page. Use the check box to toggle messages between enabled or not enabled. If the Enabled box is not checked for a message the scheduler will skip over that message and not send it out.
We’ve also added in the option to load a Message Template to a drip message (create message templates under Messaging – Message Templates from your left-hand menu).
As always, keep in mind that you can use the column headers to sort the list of drip messages by: Enabled, Sequence (Days after opt-in), or by Group. This is a simple way to keep track of multiple drip campaigns and make quick-edits when needed. If you have multiple keywords on your account you can use the drop-down arrow above the list to see each drip campaign by keyword.
Expanded Widget Options
We’ve made some updates to both the website widget and the hosted widget options. On the website widget we’ve added the option for you to add the birthday field to the widget. When you enable this feature you’ll also have the option to choose if you want to make that a required field. You can also choose whether to add the email field and if that is required or optional as well. If you want to add theses fields to a current widget you’ll need to generate the new code and update that on your website.
The hosted widget has seen a lot of changes! We’ve added all 3 of these as optional fields to use on the hosted widget. Use the Group drop-down arrow to Enable Group Select – this will pull all active groups for that keyword (unless you set a group as “Hide on Widget” in the settings for that group on your My Groups page). You can also add either the email field, birthday field, or both! Once you check to enable one of those you’ll also see the option to check a second box to make that a required field. If you make it required it will not let the customer submit the opt-in information without filling in that field. The hosted widget is perfect to send as a link in an email, use at a kiosk or on a tablet at your register, or it can even be added to your auto responder message so that the contact can fill in all the data to update all of those fields in their contact record, after they’ve opted in. If they send a text from their phone to opt-in the only data captured automatically is the phone number. The hosted widget is an easy way for them to update everything else through one action. *Tip – use a url shorener like bitly.com if you are texting a hosted widget link. This will use less characters and make the link more text friendly.
Auto Update Name Field
We’ve added the ability for a customer to send in a text message to update the name field associated with their contact record. When a customer texts in with a keyword to the short code the only thing added by default is the phone number. If you want your customers to reply with their name to update that record you’ll need to instruct them to reply to the text with Name: First Last, for example a reply text of Name: Joe Brown will update the contact record for that phone number to show his name Joe Brown. They must use the Name: before their name for this to auto update it on their file, a reply with just a name will create an inbox message on your account. Other ways to update the name, email, or birth date field are to use a web widget, import a csv file, or manually update the contact by clicking the Edit icon to the far right of their number in the My Contacts list.
Send Birthday Text Added 5/11/18
TXT180 now has the option to store a birthday and send messages based on that birth date. There are a number of ways to collect a birthday; numbers already on your list can send in a message with either Birthday: mm/dd/yyyy or bday: mm/dd/yyyy to auto update this field (this will also work with a 1-digit month and a 2-digit year). If no year is included the system will default the year to 1900. They can use hyphens or the slash between month, day, and year. So Birthday: 05/15 or bday: 5-15-1970 would both update the birthday field. The first would update it to 05/15/1900 the second would update it to 05/15/1970. If you’re using a website or hosted widget you’ll have the option to add these fields to the widget so you can collect the number, name, email, and birthday on the initial opt-in. Importing a list will also allow for all 4 fields of information. If you import a list and the contact already exists it will update the missing fields of data for that contact record, but it will not send them any message. You can also update the contact information from the My Contacts page by clicking the Edit icon to the far right of any number in the contact list.
If a contact already exists on a keyword and then fills out a widget the missing contact information will also be updated. This could be very useful if you are at a live event and want them to provide specific data. You can have them text the keyword to the short code – which only adds their phone number – and then have your auto responder send them a link to the hosted widget. When they enter their data on the hosted widget it will update all other fields of information without the need to give them instructions to reply with each piece of information in a separate text message. You can choose which fields show up on a widget and whether they are required or optional.
To use the Send on Birthday feature, go to Messaging and click on Drip Messages. Click the red Add Drip Message button on the top right of the page. Check the box next to Send on Birthday. Be sure to check the Enabled box above the message box field to enable the birthday message. Type in the message you want them to receive on their birthday and set the time that you want the message to go out. Just like drip messages you can enable this feature for All Contacts, All Contacts not in a Group, or to only a specified group.
Zapier Integration
Many businesses and organizations use some type of software like Salesforce, Mail Chimp, Eventbrite, or even Google Docs or Google Sheets. With Zapier integration you can link your current software with the TXT180 software. Use this TXT180 Zapier invitation link to get started. Zapier integration allows you to share information between the two applications. Some things you might do with the integration are: send a text to confirm a purchase, event reminder, verification text or other short text messages to your clients. In addition, you can capture client information by having them text in to your short code and then pass that information on to your email client or other software to automatically update it there as well. To integrate your Zap with TXT180, enter the API key from your TXT18o account into your Zapier platform. The API key can be found under My Account on the API settings page.
2nd Auto-Responder Option
A new feature that TXT180 has added to our text message marketing platform is the option to have a second auto-responder. The additional auto responder can be used to send a longer first message (two texts will be sent back-to-back giving you a total of 320 characters). Or you can use the second message to send a follow up text. Maybe your fist message is a video that you want people to watch and then you want to send a follow-up message 5 minutes later to see if they have any questions. You’ll find the 2nd auto responder option on the My Keywords page, use the Edit icon in the Auto Responder Set column to access this feature. Keep in mind messages count per contact for every message. Two auto responders to 100 people will use 200 messages. If it is on their initial opt-in they will also get the legal message – making it a total of 3 messages used per contact.
Expiration Date on Coupons
Another new feature you will see with the auto responder is the option to set an expiration date in your text. Use the Insert Future Date drop down arrow to choose how many days the offer is good for. If you set it for 7 days and someone opts-in on the 7th of March 2018 the sms text will insert the date of 03/14/18. So your message might say, “Thank you for joining our text club, show this message to get your FREE bagel! Offer valid until 03/14/18” The date will change every day based on the opt-in date and the criteria you have set up. This helps you customize you text marketing account to a new level.
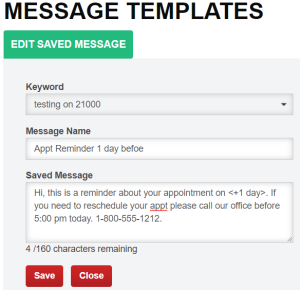
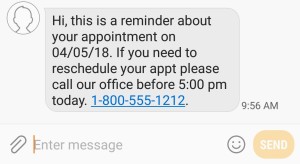
This feature can be used on any scheduled message: from the My Contacts page, the Send Message page, in the Scheduler, on Drip Campaigns, etc. To set a dynamic date in your message simply put in <+7 day> where you want the date to appear (you can use any number – the number is simply added to the date the message is being sent). If you schedule a message to go out on May 1st 2018 and you use the date tag of <+7 day> then your message will have the date of 05/08/18. This feature be used for expiration dates, appointment reminders, event notices, and much more! See the screenshots below for an example of a Saved Template for an appointment reminder (how you type it in) sent on 04/04/18 and how that message will appears to the recipient on 04/04/18 when it is received.
Extended Message Stats and Message History
A lot of customers have requested to see their text message stats over a period of time, or to see sms messages sent in the last 90 days, etc. As such, we have started storing this information for 6 months. On the main dashboard if you click the View Stats link, next to the Remaining Balance, you’ll see an option at the top to toggle down to the previous refill period – you can look back to see sms text usage stats back 5 months. To see the sent message history go to Messaging on the left hand menu, go to the Pending/Sent Messages page. You can sort the history by keyword and by a date period. “Last 30 days” is default or you can see message in 30 day cycles prior to that for example 31-60 days, etc. SMS messages older than 180 days are permanently deleted from our servers – be sure to export this information if you need to keep it longer.
Explanation of Message Stats
*Help, Stop, and the legal disclaimer message are all required for carrier compliance and to meet all regulatory requirements for short code messaging.
** A confirmation message is required on any web widget opt-in to confirm the number entered was correct and entered by the person with access to the handset for that number.
Export Contacts by Group
In the past contacts could only be export by a keyword, not at the group level. With our latest group text message updates and changes we’ve added in the option to export your contact list by group. This is an easy way to share contacts from a particular group with your team or to compare active clients in your system with other software lists. To export your contactsby group go to the My Contacts page. Select the keyword and group you want to export and then click search. Use the red Export button at the top of the page to export the list of contacts from the active group search. Or simply use the download button under Actions on the My Groups page.
Inbox Enhancements
TXT180 has made a few enhancements to the Inbox. We’ve added a read/unread feature so you can mark your messages as read or unread in the inbox – this is very helpful if you have more than one admin and want everyone to know that a message has been seen. This feature functions the same as an email Inbox. Unread messages are in bold, once you’ve read the message or marked it as read it will no longer be bold. Another TXT180 inbox enhancement is a mass delete option. Check single, multiple, or all messages and use the Action drop down menu to delete, mark as read, or mark as unread. The check box in the header will also work as a Check All function.
We’ve also added the ability to delete a contact from the keyword as a mass action from the inbox – this is convenient for those times that someone replies with a phrase that doesn’t opt them out but they clearly want to be removed. Something like “please don’t text this number again” would not opt them out but you need to remove them from your list. You’ll notice two options for deleting a contact the first is Delete Contact – this simply deletes them from your list. The second option is Delete Contact and Mark as Opt-out – with this option the contact is delete from your list and it also adds them to the Opt-out list, the same as it would if they had replied with the word Stop. This is a good idea if you ever add numbers to your list manually as it will prevent you from accidentally adding in a number that has opted out previously. Opt out numbers can only get back on your list by texting the keyword to the short code from their device.
Auto-refresh has been added to the Inbox – the page will refresh every 30 seconds to show any new inbox messages coming into the account.
Originally Posted on: September 8, 2021
Posted in: TXT180 Updates
Tags: text message marketing, TXT180 sms marketing, TXT180.com features
Questions? Give us a call 877-989-8180 or Send us a message